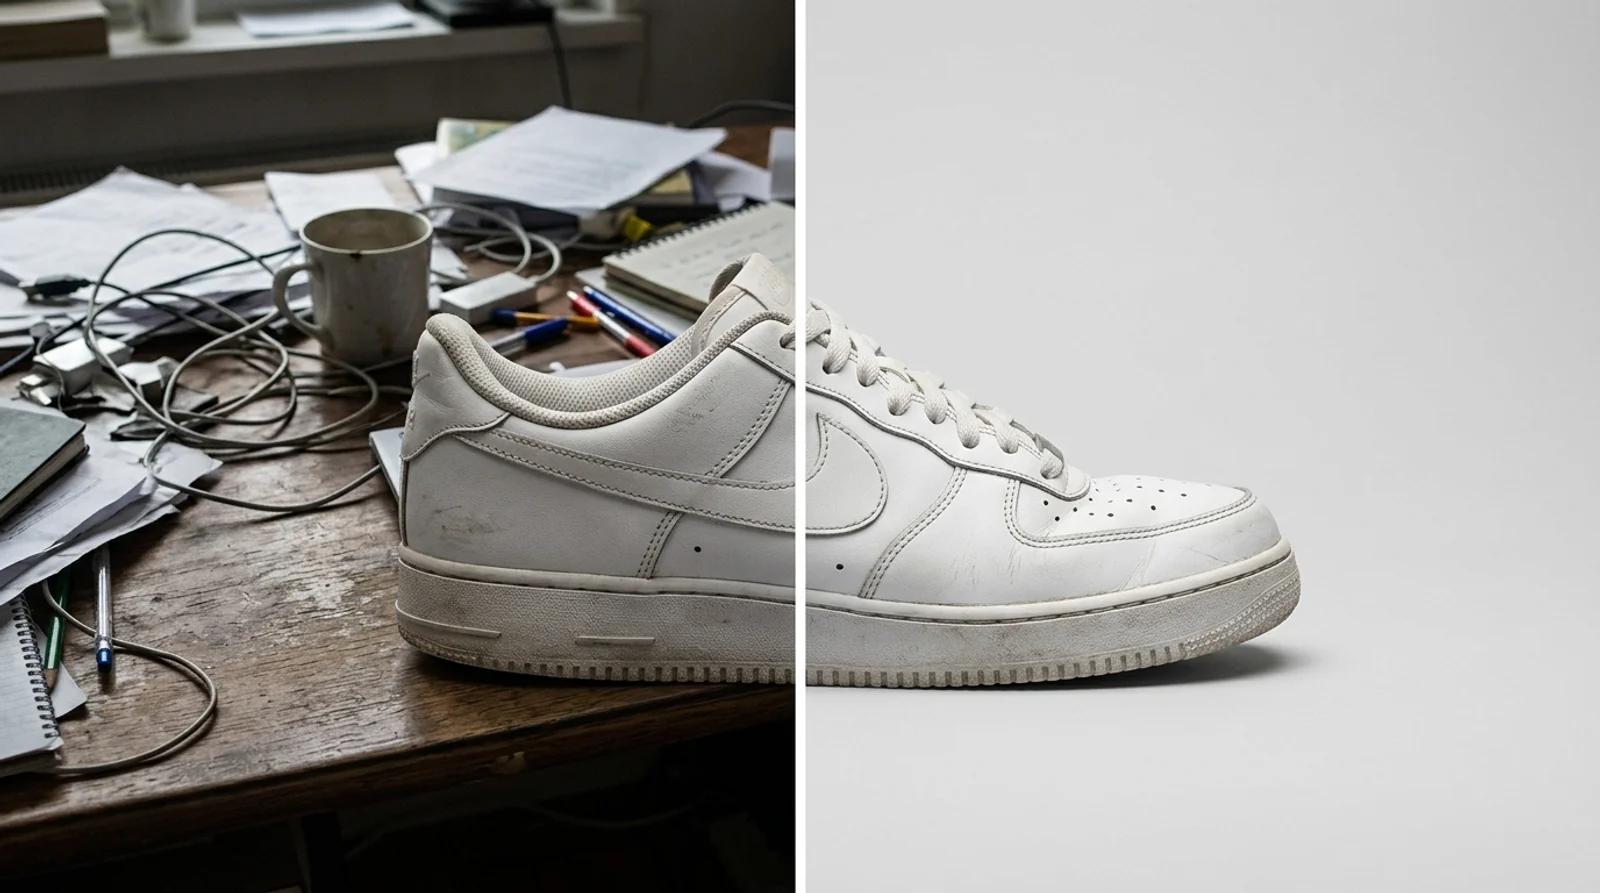
Most photos are fine except for one thing: what's behind the subject. A great sneaker shot ruined by a cluttered desk. A friendly portrait stuck against a beige office wall. A listing photo where the background distracts from the product. The subject is right, the setting is wrong.
To change the background of a photo online free, you used to need a cutout, a stock backdrop, and careful blending so the edges didn't look pasted on. An AI background changer does it in one step. You upload the photo, the model isolates your subject, drops in a clean backdrop, and adds a believable shadow so it sits naturally. The sneaker, the face, the product label all stay exactly as shot. Only the space behind them changes.
These sound similar but solve different problems, so it's worth being clear before you start.
Removing a background gives you a transparent PNG: the subject floating on nothing, ready to drop onto any layout, banner, or color later. That's a cutout. If you need a see-through file to layer somewhere else, use the background remover. There's a full guide to it.
Changing the background gives you a finished image: the subject already sitting on a new backdrop with a natural shadow. No layering, no design step after. You upload, you get a usable photo back.
Rule of thumb: if the next thing you do is "place this on a website, ad, or deck," remove the background. If the next thing is "post or list this photo as-is," change the background. This guide covers the second one.
Open the AI background changer and upload your image. Drag the file in or click to select it. JPG, PNG, or WebP up to 10MB all work.
Pick the cleanest version of the file you have. The model cuts around your subject, so the source sets the ceiling on how clean the edges come out. Best results come when:
- The subject stands out from the original background, with decent contrast.
- Edges are in focus, not heavily motion-blurred.
- The subject isn't blending into a background of the same color.
- Lighting is even, with no blown-out highlights eating the outline.
Hair against a busy background and soft, blurry edges are the hardest cases. A product on a plain surface, or a person who separates clearly from the room behind them, cuts cleanly almost every time.
With your photo loaded, click Change background. In one pass the model isolates your subject, removes the original background, drops in a clean studio backdrop, and adds a soft contact shadow underneath so the subject doesn't float.
The point of a swap is that nobody can tell it happened. The model rebuilds the space behind your subject while leaving the subject untouched: same pose, same outfit, same product label, same skin tone. Only the backdrop is new.
The default is a clean, neutral studio gradient, the safe choice for profile photos, listings, and headshots. It reads as professional without competing with the subject. If you need something specific (a pure white sweep for a marketplace, a warmer interior, an outdoor feel), describe it in the full workbench instead of the one-click action.
This is the step people skip and regret. Before you download anything, zoom in and check the edges where the old background met the subject:
- Are the outlines crisp, or is there a faint halo of the old background clinging on?
- Did fine details like hair, straps, handles, or thin edges survive?
- Is any part of the subject accidentally cut away?
- Does the new shadow fall in a believable direction for the light on the subject?
Most of the time the first pass is clean. If a busy original confused the model, run it again or start from a source with stronger separation between subject and background. High-contrast edges cut more cleanly than anything you can fix after.
When the edges look right, download the finished image. Signing in keeps your results in history and removes the export watermark from the download. You can change a background on the free base model without an account; signing in is what gets you a clean, history-backed file.
Product shots are the obvious use, but a swap does just as much for portraits. A casual photo taken in a cluttered office becomes a clean headshot for LinkedIn, a resume, or a team page, without booking a studio.
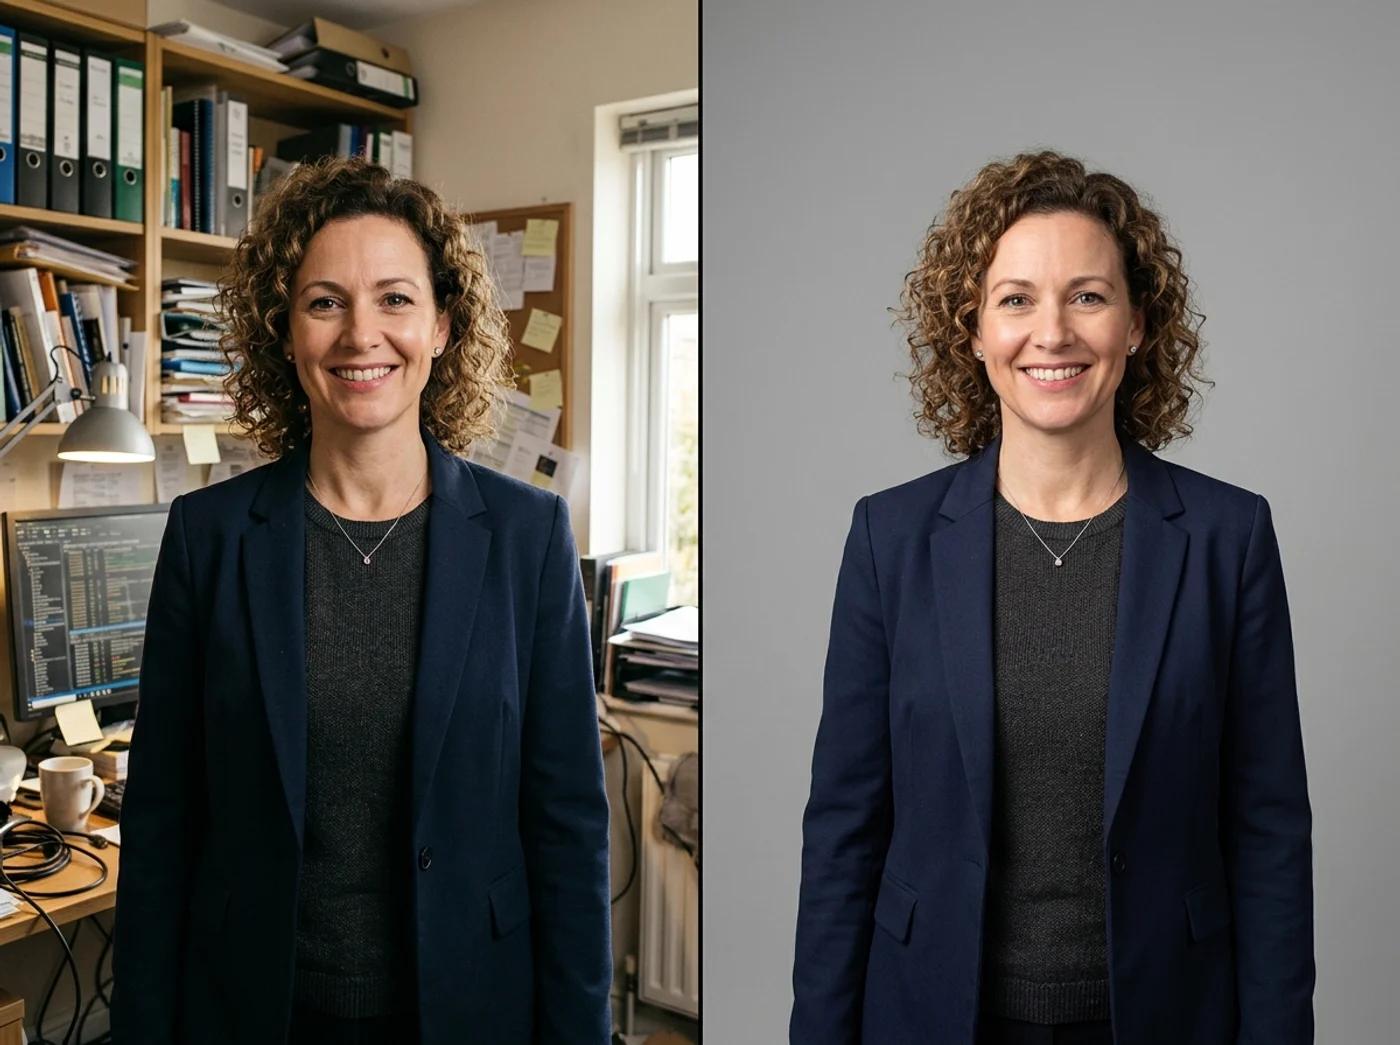
A neutral grey or soft gradient backdrop is the workhorse for people. It reads as a studio without drawing attention, and it keeps a team page consistent when everyone's photos were shot in different rooms. The model keeps your face, glasses, hair, and expression and only rebuilds the wall behind you.
If a professional portrait is what you're after, the AI headshot generator goes further: it restyles the outfit and lighting too, not just the background. Use the background changer when the photo is already good and only the backdrop needs fixing.
The right backdrop depends on where the image is going. A quick map:
| Use case | Best background choice |
|---|
| Marketplace / catalog listing | Plain white or very light gradient. Clean and consistent. |
| Team headshots | Neutral grey or soft studio gradient. Uniform across the team. |
| Social posts & avatars | On-brand gradient or a simple color that matches your palette. |
| Ads & banners | A backdrop with room for text that doesn't fight the headline. |
| Lifestyle product shots | A simple interior or outdoor scene that suggests where the product is used. |
When in doubt, go cleaner. A plain backdrop rarely hurts a listing or a profile, while a busy one usually competes with the subject you wanted people to look at.
A swap fails in obvious ways: a glowing edge, a shadow falling the wrong way, a subject that looks pasted on. You avoid most of them at the source.
- Start with contrast. A subject that separates clearly from its original background cuts cleaner than one blending into a same-color wall.
- Match the light. Keep the new backdrop's lighting consistent with the light already on the subject. A subject lit from the left on a backdrop lit from the right reads as fake instantly.
- Watch the shadow direction. The contact shadow should fall the way the light implies. If it looks off, regenerate.
- Check the hair and fine edges. This is where cutouts show their seams. Zoom to 100% and confirm strands and thin edges survived before you publish.
- Use the highest-resolution source you have. More pixels means crisper edges and a cleaner cut.
You don't need a cutout, a stock backdrop, and a blending step to fix a photo whose only problem is what's behind the subject. Upload it, swap the background in one pass, check the edges, and download a finished image. Same subject, new background.
Try the free background changer →
")

")
")