Sunglasses are one of the hardest things to buy online. They sit dead center on your face, so the wrong frame shows up in every photo you take for the next few years. Aviators that look great on the model can swallow a smaller face. A bold cat-eye that seems fun on the product page can read as too much in person. And you cannot judge the fit from a flat catalog shot taken on someone else's head.
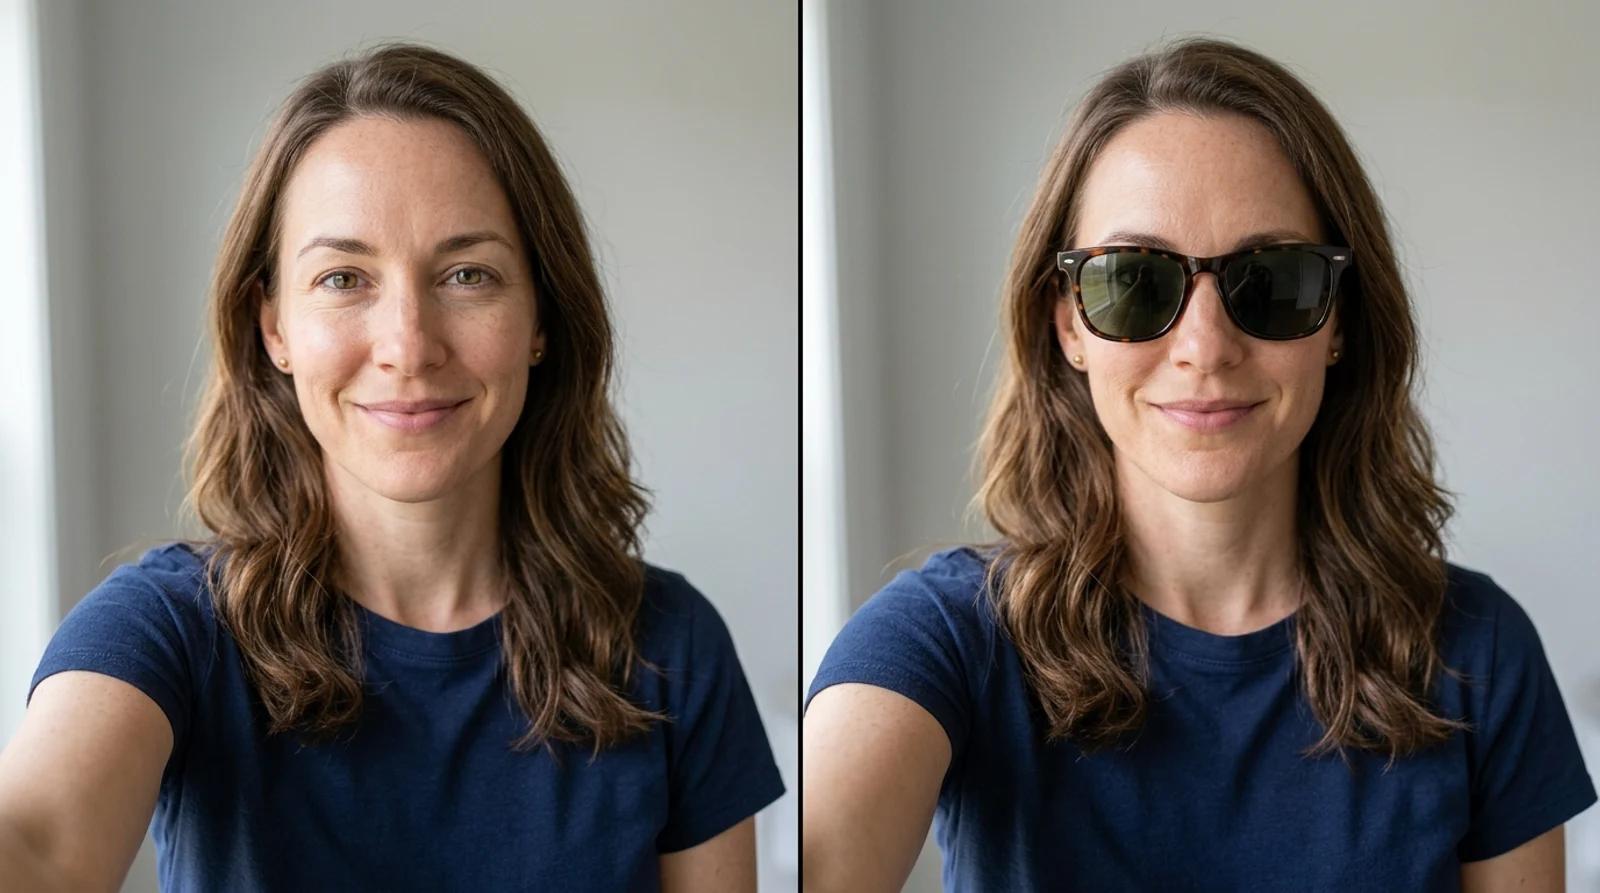
That is the gap a virtual sunglasses try-on fills. You upload one front-facing selfie, pick a frame, and the AI places those sunglasses on your face while keeping your features, skin, and lighting the same. Instead of guessing from a thumbnail, you see aviators, wayfarers, round, cat-eye, sport wrap, or oversized frames on you before you commit. This guide covers how to use it and how to read the result honestly.
A virtual try-on does one job: it helps you judge style, scale, and how a frame shape sits on your face before you buy. It works well for:
- Narrowing a long wishlist down to two or three frames worth ordering.
- Checking whether a shape that looks good on a model also works on you.
- Comparing lens tints and frame widths side by side.
- Mocking up a look for a profile photo or a social post.
It is not a real fitting tool. It will not measure your bridge width, temple length, or pupillary distance, and it cannot confirm UV protection or lens category. Treat the result as a strong shortlist, then confirm the actual measurements, lens rating, and return policy with the seller before you pay. It is also not a tool for impersonation, official IDs, or editing someone's photo without their consent.
The AI can only place frames accurately on a face it can read clearly. Open the virtual sunglasses try-on and upload a portrait that gives the model what it needs:
- Both eyes, the nose bridge, cheekbones, and face outline are visible. This is what the frame aligns to.
- You are facing the camera head-on. Side profiles and three-quarter angles make alignment unreliable, because the temple arms and bridge lose a clear anchor.
- The light is even. Soft daylight from a window beats harsh overhead light, which throws shadows that confuse where the frame should sit.
- Your eyes are uncovered. Skip existing glasses, sunglasses, or hair falling across the eye area, since the model needs a clear view of the eyes to place the lenses.
A recent phone selfie taken near a window is plenty. You are not after a studio portrait, just a clear, head-on shot with your eyes visible.
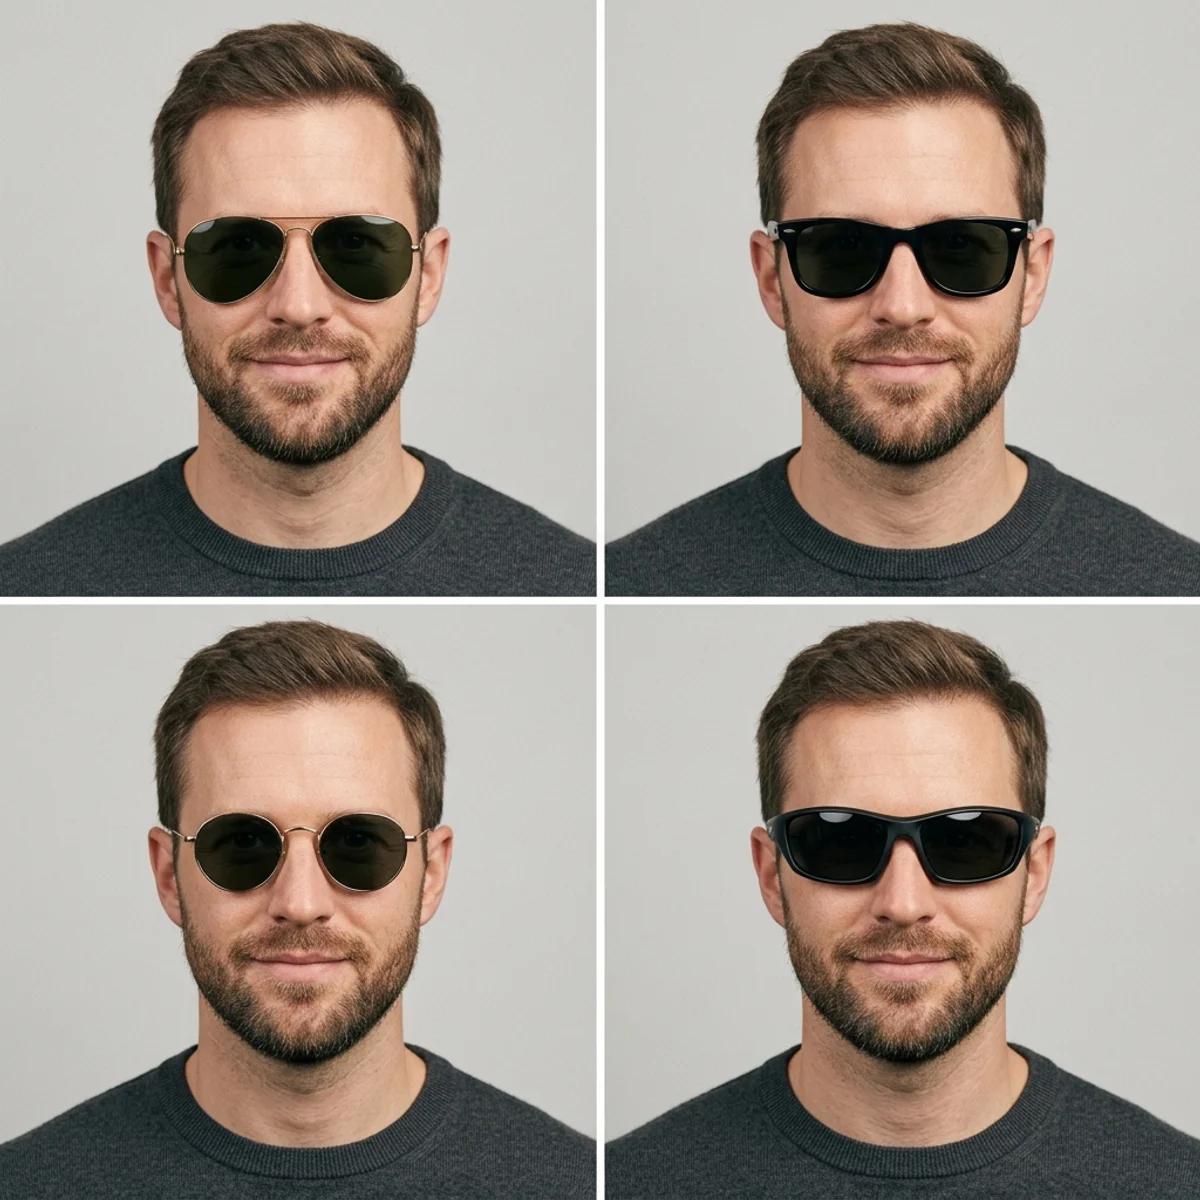
Choose a frame reference. There is no prompt to write. The styles are pre-built, so you pick the frame and lens shape instead of describing it. You get six to compare:
- Aviator: teardrop lenses, thin metal frame.
- Wayfarer: squared-off, classic plastic frame.
- Round: circular lenses, retro feel.
- Cat-eye: upswept outer corners.
- Sport wrap: curved, close-fitting athletic frame.
- Oversized: large lenses with bold coverage.
Comparing styles is free, so run more than one. Try the two or three shapes you are torn between on the same selfie and look at them next to each other. Seeing aviator, wayfarer, and round on your own face removes most of the guesswork.
Pick a frame and run the try-on. The model adds the sunglasses while keeping your identity, eye direction, skin texture, lighting, and expression stable. It takes a few seconds.
When it finishes, don't just glance at it. Zoom in and check the details that tell you whether a frame works on your face:
- Bridge height: the frame should sit naturally on the nose, not float above it or crush down on it.
- Frame width: the lenses should roughly reach the edges of your face, not run past your temples or pinch in.
- Lens tint and reflections: the tint should read the way you want, and the highlights should look like real glass rather than a flat sticker.
- Temple direction: the arms should head back toward your ears at a believable angle.
- Cheek shadows: a real frame casts a soft shadow. If the sunglasses look pasted on with no shadow, the scale is probably off.
If something looks wrong, regenerate or try a different frame instead of keeping the first pass. Each run varies a little, and a cleaner, more head-on source selfie fixes most alignment problems.

Frame shape is mostly about contrast. A frame that softens a strong jaw or adds structure to a softer face tends to flatter most. Use this as a starting point, then let the try-on confirm it on your face.
| Frame shape | Suits face shape | Vibe it gives |
|---|
| Aviator | Square, heart, oval | Classic, easygoing |
| Wayfarer | Round, oval | Versatile everyday default |
| Round | Square, angular | Retro, softens sharp features |
| Sport / wrap | Oval, oblong | Active, made for movement |
| Cat-eye | Round, heart | Bold, adds upward lift |
| Oversized | Small, oval, heart | Glamorous, high coverage |
The general rule: pick a frame shape that contrasts your face shape rather than echoing it. Round faces usually look sharper in angular frames, and angular faces soften in rounder ones. It is a guideline, not a law. The point of trying frames on virtually is that you can ignore the chart the moment a shape clearly looks right on you.
The difference between a try-on you can trust and one you can't comes down to the source selfie. A few things matter most:
- Use a sharp, in-focus shot. Clear edges let the model align the frame. Blurry or low-resolution photos produce sloppy fits.
- Shoot in even light. Face a window in daytime so light falls evenly across your face. Harsh side light and deep shadows make the frame placement guess wrong.
- Keep your head straight and level. A head-on angle with the camera at eye level is the single biggest factor in accurate placement. Tilt your head and the frame tilts with it, often unconvincingly.
- Check the fit on the nose and ears. Follow the frame from the bridge on your nose out to where the temple arms reach your ears. If that path looks natural, the scale is right. If the arms vanish or the bridge floats, regenerate or switch frames.
If every result looks off, the fix is almost always a better source photo, not more attempts.
You can upload a selfie, pick a frame, and generate a try-on on the free model without an account. Comparing the six styles costs nothing. Signing in removes the export watermark from your download, so the saved image is clean and ready to share or drop next to a product page.
You don't have to gamble on sunglasses from a flat product photo. Upload one clear, well-lit selfie, compare a few frame shapes on your own face, and check the fit before you order.
Try the free sunglasses try-on →
")
")

